If you are the proud owner of an Arduino Uno board but prefer to work in an Ubuntu VM instead of dual-booting, this article is for you. I'll guide you through configuring VirtualBox under your Windows host to get Arduino working properly.
Installing required programs
Before we worry about USB ports/serials/whatever, let's just install the stuff we'll need on our Ubuntu guest.
Installing Python 2.7 and pip
This installation requires Python 2.7 and pip. Read through my tutorial on installing both.
Installing the Arduino IDE distribution
Assuming the Ubuntu version on your VM is never than Ubuntu 10.10 (Maverick), simply
$ sudo apt-get install arduino
Otherwise, consult the official documentation
Installing picocom
picocom is a "minimal dumb-terminal emulation program", and we'll be using it for serial communication. Installation is done through apt-get.
$ sudo apt-get install picocom
Installing ino
Instead of using the Arduino GUI, we're going to use ino. ino allows us to compile and upload arduino projects from the command line, enabling us to use our favorite text editors such as VIM or emacs.
To install ino,
$ sudo pip install ino
Installing the drivers
Follow the instructions on getting the Arduino Development Environment for your Windows host.
NOTE: On step 4, "Install the Drivers", it says
Finally, navigate to and select the Uno's driver file, named "ArduinoUNO.inf", located in the "Drivers" folder of the Arduino
What I had to do was just select the folder
C:\path\where\I\extracted\arduino\drivers, I did not select an individual
file.
Verifying the Windows Installation
Verify the Windows installation worked by getting the Blink program to work on
your Arduino board. First, make sure your Arduino board is plugged in. Now Open
up the arduino executable on your Windows machine. This will bring up a tiny,
blue-green text editor. In the editor, navigate to File ⇒ Examples
⇒ 01.Basics ⇒ Blink. Click the Upload button (to the right of the
Check mark), press the reset button on your Arduino board, and see if the LED on
your board blinks in a rhythmic fashion.
If everything looks good, it's time to proceed to the next step. Otherwise, it's time to start Googling :(
Configuring VirtualBox
We now need to help facilitate communication between our Ubuntu VM and our
Windows Host. You might be wondering why we don't just attach the USB device
from VirtualBoxes Devices ⇒ USB Devices menu. The reason is because the
extra USB virtualization introduces enough latency to make uploading fail
sporadically on our VM. The solution is to forward serial ports for more direct
communication with the host.
Getting the port number
First, we need to get the port number associated with our Arduino bored. To do so, we need to open the Device Manager within Windows. We can accomplish this by opening the Start Menu, and typing "Device Manager" in the "Search programs and files" box that will probably already have a blinking text cursor in it. Click the top result, which should just read "Device Manager"
Look for the "Ports (COM & LPT)" section. Click the + sign to expand it, and you should see "Arduino Uno (COM#)" where # is some number. In my case, it was 3.

This number is very important, so I'll refer to this particular number as # for the upcoming section.
Configuring ports in VirtualBox
Shutdown your VM if you still have it open. Don't save the state - completely shut it down.
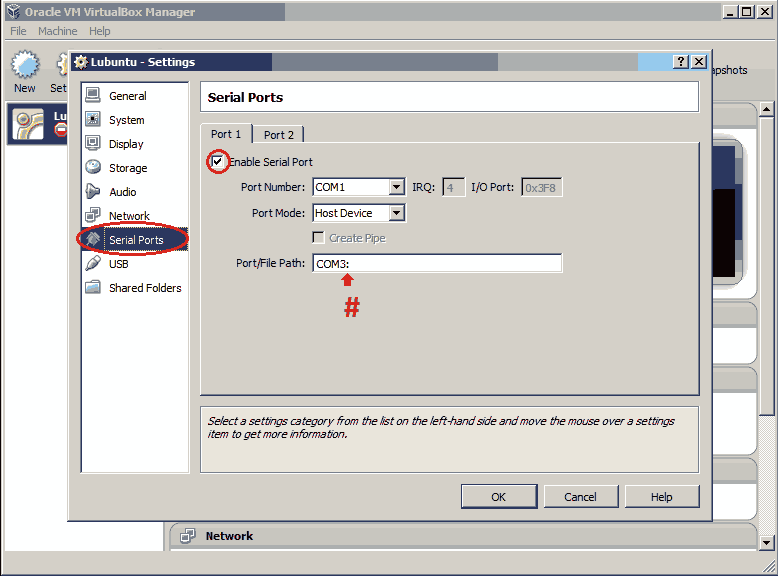
Now navigate to VirtualBox, select the VM you plan on working with, and then click settings. Select the "Serial Ports" option on the left hand side.
Click the "Port 1" tab, and then select "Enable Serial Port". Regardless of
what # from earlier was, the Port Number should be set to COM1. This tells
VirtualBox to have the Arduino board mounted at /dev/ttyS0. For the Port Mode,
select "Host Device". For "Port/File Path:", Enter in COM#:. The colon needs
to be there.
That's it for configuring VirtualBox. Start your VM back up, and we'll wrap up this installation with testing and configuring ino.
Testing, Using, and Configuring ino
A majority of this information is taken straight from the ino quickstart quide.
Make a directory you would like to store your arduino projects in, and cd to it.
$ mkdir ~/arduino
$ cd ~/arduino
Now make a testproject directory and cd to it.
$ mkdir testproject
$ cd testproject
Now we initialize an arduino project.
$ ino init
If you look at the contents of your testproject directory, you should see a
lib and a src directory. Within src, there will be a file called
sketch.ino. Clear out the file and paste in the following, which will make the
LED on the arduino blink very rapidly.
1 2 3 4 5 6 7 8 9 10 11 12 13 14 | #define LED_PIN 13 void setup() { pinMode(LED_PIN, OUTPUT); } void loop() { digitalWrite(LED_PIN, HIGH); delay(100); digitalWrite(LED_PIN, LOW); delay(100); } |
Now make sure you are in the project's root directory, and then run the build process. This will compile your program.
$ cd ~/arduino/testproject
$ ino build
If the build succeeds, we can now upload to our Arduino!
$ ino upload -p /dev/ttyS0
Upon successful upload, we should see the following
avrdude: AVR device initialized and ready to accept instructions

Reading | ################################################## | 100% 0.00s

avrdude: Device signature = 0x1e950f
avrdude: reading input file ".build/uno/firmware.hex"
avrdude: writing flash (1034 bytes):

Writing | ################################################## | 100% 0.67s

avrdude: 1034 bytes of flash written
avrdude: verifying flash memory against .build/uno/firmware.hex:
avrdude: load data flash data from input file .build/uno/firmware.hex:
avrdude: input file .build/uno/firmware.hex contains 1034 bytes
avrdude: reading on-chip flash data:

Reading | ################################################## | 100% 0.20s

avrdude: verifying ...
avrdude: 1034 bytes of flash verified

avrdude: safemode: Fuses OK

avrdude done.  Thank you.
Permissions Issues
Remember that /dev/ttyS0 represents our Arduino, and we specified that
specific location by selecting the Port Number as COM1 in the VirtualBox
settings. There's a pretty high chance you receive the following error upon your
first upload attempt:
~/arduino/testproject$ ino upload -p /dev/ttyS0
/bin/stty: /dev/ttyS0: Permission denied
stty failed
If that's the case, follow these instructions. Otherwise, skip to the .inorc section.
First, we need to figure out what group is associated with this port.
$ ls -al /dev/ttyS0
The output I received from the command was
crw------- 1 root dialout 4, 64 May 7 04:34 /dev/ttyS0
Thus the dialout group owns the port, but it's not even group writable. So we
need to add ourselves to the dialout group and then make the port group
writable.
$ sudo usermod -a -G dialout YOUR_USER_NAME
$ sudo chmod 660 /dev/ttyS0
NOTE: You will need to log out and log back in before you become a part of the group.
Now go back to the project directory and attempt the upload again
$ cd ~/arduino/testproject
$ ino upload -p /dev/ttyS0
.inorc
Congratulations! You now have your Arduino environment working on your Virtual
Machine. There's only one last detail to take care of. In order to avoid having
to pass the port to the $ ino upload command every time, we can create a
configuration file that stores our desired port for us. Execute the following:
$ echo -e "serial-port = /dev/ttyS0\n" > ~/.inorc
Examine the contents of ~/.inorc for yourself to make sure the command worked.
Now, you should be able to go back to your project and simply run
$ ino upload
without a need to specify the port.